Ear Pathologies and Audiograms Part 2 – On the Soap Box

What a strange title to give to part 2 of this series! I have used this title as they are the audiograms that I talk about often, that people either miss or mistake for something else. In all cases except for some of the malingers it led to unnecessary emotional stress for the client’s involved.

Collapsed Ear Canals

Tracy who started TJ Audiology Training and no doubt many others, say that I harp on about this incessantly, and I am happy to admit I do! I think it is a real issue that we miss far too often. One research study on over 300 individuals aged between 3-97 years found that ear canal collapse was observed in 11.4% of their subjects. Prevalence ranged from 6.3% to 36.6%. With the higher percentage score being for the over 75’s. More males than females they found had the problem.

So why is this such an issue for audiograms? Canal collapse will mimic a conductive or a mixed loss. This can then lead to unnecessary ENT appointments and investigations, when all along it was a collapsed canal. This makes us as audiologists look bad if we haven’t seen it. It’s is in some cases an unnecessary referral/cost for MRI’s and ENT time. Even more importantly the personal stress to the client, who is now being investigated for a potential ear pathology cannot be underestimated.

Let’s, talk about how to check for it. Firstly, when we do otoscopy, and you are looking behind the pinna, look also at the opening to the ear canal. Is it narrow? If it is press on the middle part of the pinna. If the canal narrows, you potentially have a collapsed canal.

Client history may also be a dead giveaway! Clients, with collapsed canal will often complain that ear buds don’t stay in or are uncomfortable or they have to use the smallest ear bud. Some will even notice if they press the phone to their ear, they hear worse.

What happens during an audiogram with a collapsed ear canal?

  • The pressure from the earphone can partially or fully close the ear canal 
  • This can cause increased hearing thresholds, especially at high frequencies 
  • The results can mimic other conditions, like noise-induced hearing loss 
  • Client hears you better than their audiogram would suggest.
  • If the client already has hearing aids, they will often complain the hearing aids are too loud and/or occluding, and come back for numerous adjustments and the settings of the aids will end up being under target.
  • They will often have normal tymps despite the conductive loss.

Example 1

Example 2

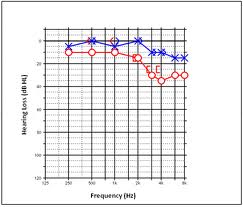
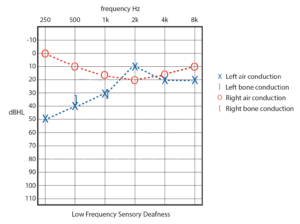
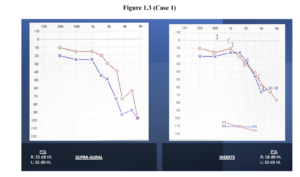
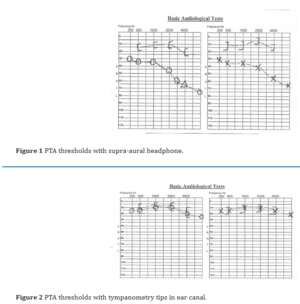
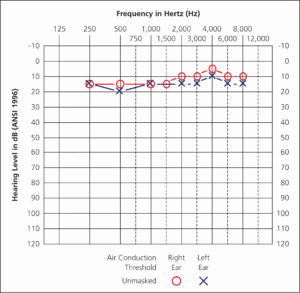
Above are 2 example audiograms. You can see how in case 1 the higher frequencies have been affected (from Collapsed Ear Canal and Sudden Sensorineural Hearing loss) In case 2 which was a severe canal collapse, it has affected all frequencies. Case 2 is exactly one of those cases where multiple investigations occurred before they realised the issue. (from Bilateral Conductive Hearing Loss due to Collapsed Ear Canals in a 35 Years Old Female – MedCrave online).

As we have said previously mass (a canal collapsing over itself) will affect the higher frequencies which is why we see in case 1, the higher frequencies are down. If masked bone had been done on the supra-aural audiogram there would have been an air bone gap. The audiologist in this case realised it was a collapsed canal and then used inserts hence why there is no masking or BC.

In case 2 it’s a complete collapse causing both stiffness and mass and hence why there is an airbone gap across all frequencies. However, it is worse in the higher frequencies this is another clue!

In both cases tympanometry results were showing normal middle ear movement.

What to do if you don’t have inserts?

Not everywhere has inserts. Some people have used speculum to hold the canal open and then put headphones on top. This can be uncomfortable. I have found using tympanometry tips work best (as big as is comfortable). Cut off the flange part of the tymp tip, tie cotton string through it and knot it; and then insert. The cotton string makes taking it out so much easier. Always note on your audiograms that you have found collapsed canals. This ensures that all individuals attending to this client now and in the future are aware of the issue.


Let’s fool you audiogram

This audiogram occurred when I was working in the NHS. Whilst it is possible that the loss occurred post operatively. I find that unlikely as the previous audiograms hinted the underlying loss.

As it was a child people suspected it was due to slight inattention/boredom during a hearing test (the child was under 7). As you can see pre-operation both sides have a conductive loss. However, the right side is showing a mixed loss at 2000Hz. Staff though this was a false positive. Look at the audiogram below though, there is a hint that this may be sensorineural, even if the BC is incorrect. Why is the AC dip so much worse than the adjacent frequencies at 2000hz on the right? Tymps were flat in this case.

Pre-operative

Post operative

I strongly suspected that I would get the above audiogram as the 2 previous audiograms had shown the dip in AC & BC at 2000Hz to varying degrees. The dip at 2000Hz is out of proportion to the other frequencies around it, yes it can be fake if it isn’t repeatable to some degree. Given that the dip, stayed in all prior audiograms should have alerted to all that there was potentially an underlying sensorineural hearing loss at 2000Hz on the right. The child reported much better hearing post operatively but still some issues in noise. Needless to say, it was a shock to both the mother and the child. This result did not change post grommets falling out or in later tests. Unfortunately, I wasn’t able to find out the probable cause of the sensorineural dip at this frequency.

I always say if it doesn’t look right, it isn’t right. This dip at 2000Hz was consistent. It is rare for people to fake the similar levels of an audiogram well over a series of hearing tests.


The malinger!

Malingering means not giving a true result. There are many different reasons for this. It could be due to attention seeking, psychological issues, misunderstanding instructions, or wanting compensation for their hearing loss. Jerger, in 1981 came up with the below statistics, in brackets are my suggested reasons.

  • 2% of population
  • 7% in children age 6-17 years
  • Typical mean onset of NOHL = 10-12 years (school stress, sibling has hearing loss)
  • Rare below 7 years of age (as children under this age seek approval)
  • Up to 50% of those seeking compensation

So, what type of audiograms would you see?

 Observation

  •  PTA response pattern
  •  Audiometric pattern  –  e.g. flat SNHL or worse than subjective hearing level
  •  Between ear unmasked level difference greater than 70 dB for AC and 10-20 dB for BC
  •  History – a lot can be gained by listening to the patient e.g. sibling with hearing loss, exams coming up, trauma.


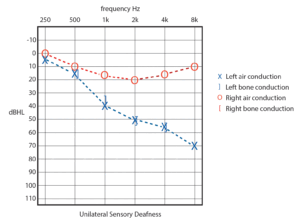
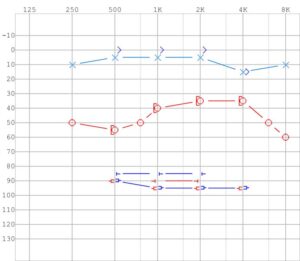
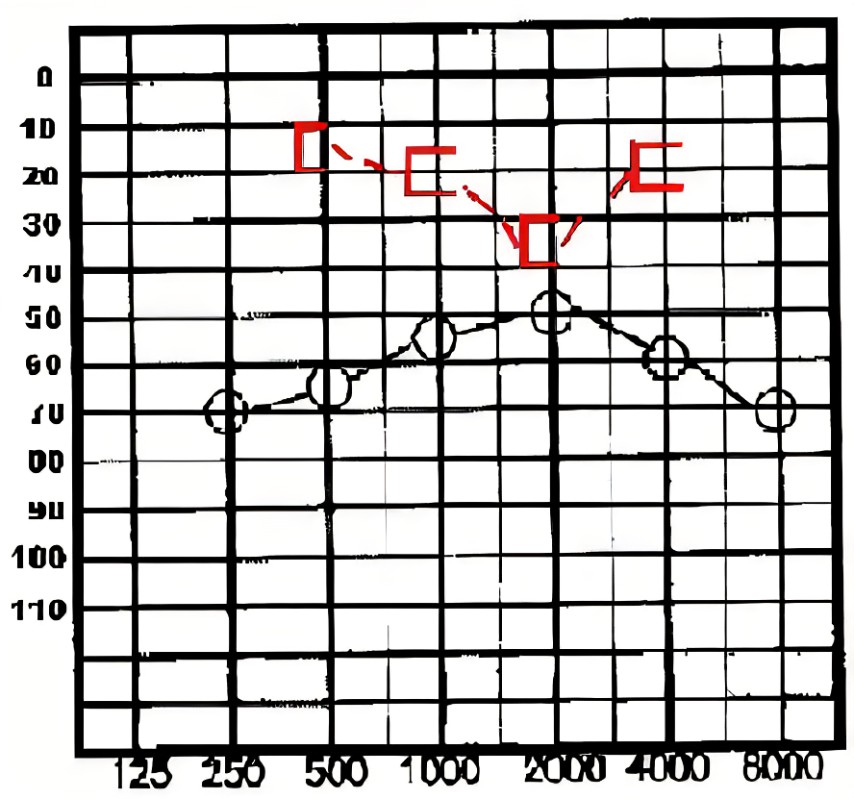
The above audiogram’s AC thresholds on the right were not yet masked. Therefore, this a malingering audiogram. This is because it isn’t possible for there to be more than a 70dB difference between ears without the good ear (left) helping the bad ear. Therefore, we would expect better AC results on the right pre masking than what we are given above. True hearing test results on the right would be better around 60-70dB and deteriorate when rule 1 of masking is applied (more than 40db difference between AC thresholds). Also why is the BC so good particularly if there is no history that suggests conductive loss.

This is an easy one to spot. However, taking a verbal history with a client tells a lot. For example, if you a getting a moderate to severe sensorineural hearing loss but they can still hear you speak with no hearing aids when you turn away, well that isn’t possible!

Also flatter audiograms are easier to fake than a sloping loss. So we see these more with malingering audiograms.

Remember the above audiograms are examples, variations to these will occur given clients otological history. But hopefully I have given you a good place to start.

Coming soon: Part 3 – Middle ear pathologies such as otosclerosis

You need to add a widget, row, or prebuilt layout before you’ll see anything here. 🙂

Ear Pathologies and Audiograms: Part 1 (Frequent Offenders)

Our BSA Audiometry course is a great place to start when you wish to learn how to do a basic audiogram. For those of you that are training to be an audiologist then we offer a masking course too. Please look at our training calendar for dates for these Training Calendar – TJ Audiology Training. We will soon be offering masking theory as an online tutorial, through a portal accessed from our webpage (watch this space)

So, you understand how to do an audiogram but what do the results mean? What are they telling me? When I started audiology 30 years ago, we had a great text book by James Jerger called Clinical Audiology (easier to read than Katz!!) that gave you both audiograms and tympanograms for different types of hearing loss and this helped give you a starting point. Its long out of print now. However, we still regularly use his classifications for our tympanograms.

I am not going to explain an audiogram graph and the different symbols (AC: Air Conduction and BC: Bone Conduction) and degrees of loss, I am assuming that you already have this knowledge! Let’s, start simple and then get more complex (because there is so much information to give this will be an ongoing series). Remember the list is not exhaustive and you will get people that don’t fit the normal pattern. This is why the BAA Onward referral guidance – British Academy of Audiology |British Academy of Audiology has red flags for referral onto ENT, include other audiological issues such as dizziness, tinnitus and facial palsy, not just the audiogram.

Normal Hearing

Please note if hearing is normal but there are other red flags such as dizziness or unilateral or pulsatile tinnitus onwards referral will be required (if these red flags are present for any of the hearing loss below then onwards referral to ENT will still be needed). You would generally expect normal tympanometry results.

Sensorineural Hearing Loss

Sensorineural. The triangles which are the bone conduction results are within 10dB of the air conduction thresholds indicating that this is a mild to moderate sensorineural hearing loss. You would generally expect normal tymps with this loss.

Noise Induced Hearing Loss

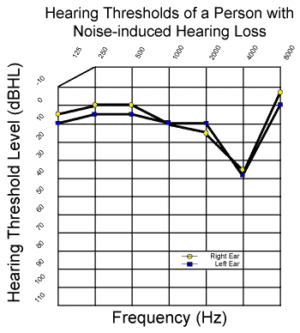
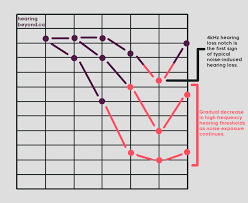
With a noise induced loss you will see a dip between 3-6kHz and then upwards improvement and the BC results within 10dB of the AC (only AC shown on these examples). However, as a client ages, then you add an age-related loss on top or increasing noise exposure (as shown in the 2nd graph) then the proportions will change. You would generally expect normal tymps.

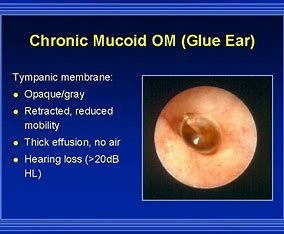
Glue Ear

Glue ear is often found in children under the age of 7-9. The eustachian tube is narrower and flatter than in an adult. Children under this age are more likely to suffer from Glue ear/Otitis Media as the eustachian tube is unable to drain as effectively.

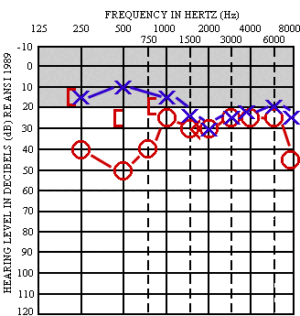
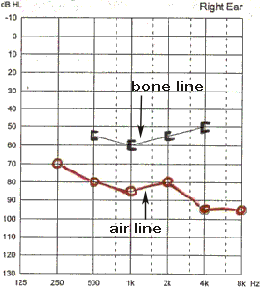
The audiogram with show reduced hearing through the headphones (AC), but the bone conduction results (BC) will be within the normal range. (20db or less if there is no underlying sensorineural hearing loss). You will either have a flat tymp or negative middle ear pressure for the reasons explained below.

The audiogram gives a flatter presentation when the middle ear is so fluid filled that both mass (how much mass is there in an object) and stiffness (how stiff the object is) are being affected. Stiffness affects the lower frequencies and mass the higher frequencies. If there was some draining or improvement in the glue ear than you would see the higher frequencies improve. (as there is now less mass)

Tympanosclerosis

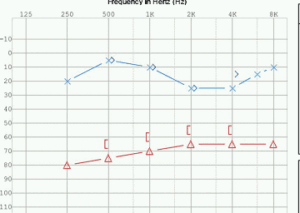
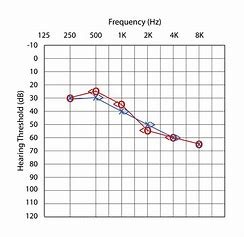
Tympanosclerosis is scaring on the eardrum. The scarring occurs either from perforations that have healed or from having had grommets. The amount of scarring will be dependent on the amount of irritation and bleeding that has occurred during these events.  Scarring will cause the eardrum’s movement to be stiffer. Stiffness as we said earlier will affect the lower frequencies as shown in the audiogram. Tymps may show restricted or shallow movement.

Perforation

Remember this is an example audiogram and your audiograms may differ . In this case the client already has an underlying sensorineural hearing loss (the BC is out of the normal range).  The degree of conductive component of the loss will be dependent on how the perforation affects the transmission of sound from the middle ear space to the cochlea. As for tympanometry you will have either a flat tymp with a large canal volume or you will not be able to obtain a seal. Below is another audiogram example for a perforation where the squiggly lines (masked BC are within normal and the AC is down).

Collapsed Ear Canals : Making Earmoulds

Collapsed Ear Canals: Earmould impressions and hearing aid issues

Collapsed ear canals can be problematical when it comes to getting a well-fitting ear mould. The canal can neither be too long or too short. If either, then the earmould will be pushed out of the canal with jaw movement. A study in Brazil from 2017 suggested it occurs in on an average in 11% of clients. Statistically, they found it was between 3% – 36% across age groups with the largest percentage in individuals 75+ . Males are more likely to suffer from canal collapse.  Ear canal collapse prevalence & associated factors among users of a centre of prevention and rehabilitation for disabilities 

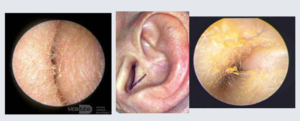
                                   So how do you know if the ear canal is collapsing ?                                        As shown in the 2nd image above.

Firstly, when doing otoscopy, we always look behind the ear for scars. Then we look straight into the canal. Often without first truly observing the canal and concha. I always tell my students to put some light pressure on the pinna to look to see if the ear canal is still remaining open. A collapsing canal will close further with just a little pressure, it will become a very narrow slit.  You then know you have a collapsed canal.

Clients with collapsed canals may be more prone to wax accumulation (as it can’t exit the ear easily) but more importantly they may have issues with keeping hearing aids in their ears.

Open Fits/ Receiver-In-The Ear fittings with collapsing canals?

The client may be new to hearing aids and they wish to try an Open Fit or Receiver-In-The Ear with a dome; if their hearing loss allows. Or they already have  hearing aids and prefer this option to an earmould.  All you can both do is try and see if this works.

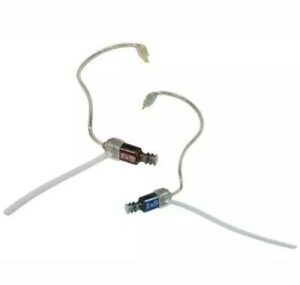
Be aware that you will need to have a trailing arm/tail on the wire to ensure that the wire and dome don’t push themselves out when the client speaks. See below image of what this tail looks like. I always say to these clients that this type of fitting may not work and you may need an earmould if we find it keeps pushing itself out. (This saves them having unrealistic expectations and getting upset when things don’t work)

So, they need an earmould … What advice would I give you?

When it comes to everyday impressions most earmould manufacturers preferred a closed jaw impression (the client doesn’t talk or move their jaw whilst the impression is setting).

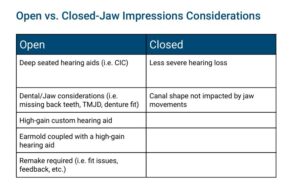
This is fine when the client has a normal shaped canal or their canals are not highly mobile. However, as Ahead Simulations chart Earmold Impressions – AHead Simulations shows below you should always consider doing open jaw impressions if you have any of the below issues.

It is strongly advisable to take on open jaw impression for ears with collapsed canals, or highly mobile canals. In fact, I would suggest where you are up to your 3rd remake, comfort has been an issue or you know the canal is very mobile, then make both open and closed jaw impressions. Then the manufacturer can compare the two.

Also THINK! I made the mistake once of making sleep plugs for a client and not realising that she wore a mouth guard when sleeping. The sleep plugs didn’t work at all! I then made an open jaw impression which was consistent more with the shape of her canal when the mouth guard was in and hey presto it was a good fit! (she brought her mouth guard in to the 2nd appointment)

If the client wants a canal mould for a collapse canal, then the mould requires an anchoring point like a claw/spur as shown below.

How do I take an open jaw impression?

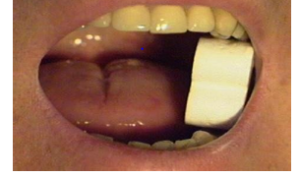
In order to take an open-jaw impression, a client opens their mouth wide using a bite bar before the impression material is injected. Keeps the bite bar in their mouth and this is not taken out till the impression material is fully cured.

A mouth prop can be bought from Impression Bite (25 Pack) – Puretone Shop

The recommended method according to the British Society of Audiology (BSA) is to insert the prop lengthwise in the corner of the mouth at the side the impression is taken as shown above. ‘For this process a dental mouth prop or bite-block should be placed between the subject’s side or rear teeth, after the otostop is inserted. (Reproduced with permission of Starkey Laboratories) A new and clean mouth prop should be used for each subject. The position of the otostop should be checked carefully using an otoscope when the mouth prop is in place to ensure there are no gaps between the otostop and the canal walls. The subject should be given a tissue to deal with any dribbling when the mouth prop is in place. Once the impression is set the mouth prop should be removed first. As the impression is likely to be a tight fit, extra care is required to ensure it is removed safely. With an open jaw it is particularly helpful if the subject moves their jaw gently from side to side during its removal’. (BSA Recommended Procedure 2023 Aural Impression Taking)

What next?

It may be a good idea to also make a closed jaw impression as well so the mould manufacturer can compare the two. Some people also do talking/moving jaw impressions, the thought is that the shape of the canal will be somewhere in between the two and give a more truthful impression of the ear canal.

At the moment it isn’t enough evidence to indicate whether there is a benefit to talking impressions over open jaw, so we are best to stay with the BSA recommendation of doing open jaw.

Basically, the rule of thumb is if they have had issues getting good moulds in the past, have collapsed canals or flatten conchae, or they have overly mobile canals (can check when doing otoscopy or they may have jaw issues that they have told you about) then do an open jaw impression.

Let the mould manufacturer know that is an open jaw impression, write as much information on the impression sticker to let them know of the issues (they don’t have a crystal ball) and then send on, and hopefully you should get a good earmould back that your client is happy with.

Lastly……

At some point soon will be a blog from me on canal collapse and the audiogram. I honestly believe this is an issue that is far too often missed by audiologists and audiometricians, resulting in clients being unnecessarily referred (and embarrassingly so) onto Ear, Nose and Throat Surgeons. Be prepared….. as I will definitely be on the soap box screaming on this subject!

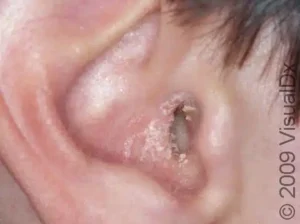
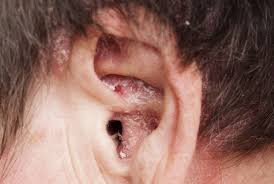
OTITIS EXTERNA

As you know Wax Removal is now one of the courses we run at TJ Audiology Training. This blog is about what Otitis Externa is; how to spot the signs and what to do, if you are removing wax, about to take an impression or to do a hearing test.

What is otitis externa? Firstly, it’s in the name Otitis is Latin for ear and Externa is external ear and it is an inflammation/infection of that area (generally it just the ear canal).  Some people call it swimmers’ ear. But be aware this can mean something different depending on the region you live in the UK or what country you are in.

What causes Otitis Externa?

We aren’t exactly sure but some of the possible causes are:
  • Damage to the skin in the ear canal (caused by cotton buds, scratching or poking) can cause inflammation and infection.
  • Water can get into the ear canal during swimming. The stagnant water triggers an infection (Remember all water contains pseudomonas bacteria) . This often happens if there is a lot of wax and the water gets stuck behind the wax.
  • Hot, humid weather makes inflammation of the ear canal more likely to develop.
  • Skin conditions such as eczema, or psoriasis, can make someone more likely to get problems with the ear canal.
  • Diabetes, radiotherapy (near the ear) and immune and conditions that effect the immune system can also make the client more prone to infection

How to spot the signs?

  • In general the first sign your client will complain of is persistent itchiness and dry flaky skin around he canal and their may be some redness too.
  • Smell – this like off cheese or smelly socks (it stays with you when you smell it!)
  • A watery discharge from the ear canal (this can change later when its whiter)
  • Discomfort moving the jaw when chewing or speaking.
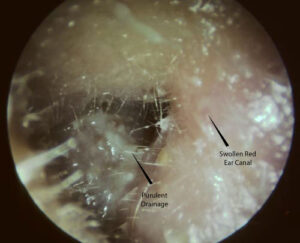
  • The ear canal starting to close up due to swelling and inflammation.
  • Reduced hearing due to the canal being full of discharge or the canal is completely swollen
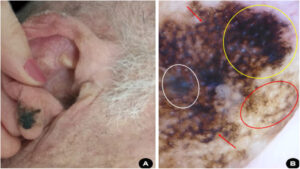
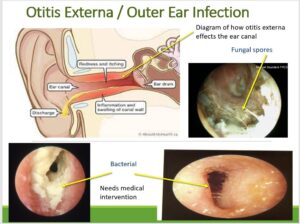
  • Fungal spores are also a form of otitis externa. These will be either white and furry or black (see picture below)

What should you do as an ear care professional?

Firstly, if they are seeing you for ear impressions or a hearing test, then you need to send them away. The swollen canal will prevent an accurate impression and you can’t do a hearing test as the risk of cross infection is too high.

What if they are seeing you for wax removal?

It may be that you can’t see it or smell it till you have removed some wax. If this is the case then remove as much as you can comfortably for the client. This will give any intervention a better chance of working, as you have made the canal clear of as much debris and discharge for antibiotics to work on the skin. Remember the ear may be sore so you may have to work slowly and gently and you not be able to remove all of it. (Please note irrigation is not an option here only microsuction; as water from irrigation will make things worse).

Remind them of good aural hygiene. No water near the ears and no touching of the ears whatsoever.

Once you have removed the wax and discharge, refer the client to the GP. They may prescribe eardrops or spray. Often, it’s a combination of an antibiotic to treat any infection, and a steroid to reduce the inflammation and itching. The treatment usually lasts for 7 to 10 days. They need to follow the prescribed course. If they return to you because the treatment hasn’t worked, then you need to recommend that the nurse or GP take a swab sample, as the antibiotics may be the wrong type for the bacteria present. To understand the prescribing pathway otitis-externa-acute-and-chronic.pdf  (Edit 9.1.25)from Nottinghamshire Area Prescribing Committee is a very helpful document. 

Edit 9.1.25 Outer ear infection or otitis externa ENT UK is a useful sheet to give to clients.  

Lastly

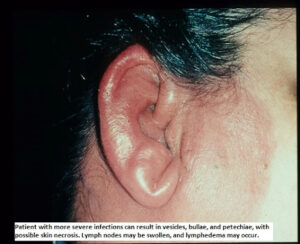
If the canal is swollen shut and the pinna and the concha are also swollen then the otitis externa has developed into cellulitis, this is a rare occurrence/side effect . (This may have occurred due to the client scratching the already infected ear and adding another bacteria). They will require intravenous antibiotics for this, so in this case suggest they attend A+E as this cannot be given at a GP surgery.


Cochlear Anatomy

Personally my mind boggles when it comes to this subject. Cochlear anatomy is amazing and the cochlear itself is so tiny only 36mm in length and yet it does so much. Whilst there are many good explanations out there, anatomist Dr Sam Webster description from Swansea University is one of my favourites. Watch his video below for more information on cochlear anatomy. Be prepared to get a cup of coffee or tea and set 30 minutes aside to watch his explanation!

Whats new with TJ Audiology Training

Its been a long while since we have posted a blog!!!!!!!!

TJ Audiology Training as you may have noticed has changed its name ever so slightly and we now have a new a fantastic new logo.  Watch this space for new developments  in the next 6-12 months. Like our new wax course Ear Wax Removal/ Aural Care Course

We will be running the wax removal course again on 22nd -23rd January 2025; with volunteer human ears to practice on too! Our students loved the September course which we ran using equipment from  Puretone   so please get in touch if you would like to know more.

Otis – Audiometry training with virtual patients

Otis the virtual patient (from Innoforce.com) can be use to practice basic audiometry and tympanometry and masking.

We use it in our classes as it is a great way of developing your skills in audiometry without having the pressure of the time or the client’s ability to focus, while getting used to the controls and techniques required. If you’re learning how to carry out masking, it is an invaluable learning and evaluation tool and your don’t need to rely on your supervisor to explain results.

Otis is a little bit like a real person, for example, your client can fall asleep if you take too long or shout if you present sounds that are too loud. You can view your otoscopy, history and tymp data as part of the assessment. There is reference data for masking and symbols.

You have real time evaluation and assessment of your procedure as you do the audiometry – it tracks your accuracy, time and errors. You can also progress from easier audiograms, to more difficult cases.

The structure and function of the ear and its role in hearing and balance

Although the ear is small in size, it is essential for hearing and balance, and problems of the ear can be linked to other conditions. Understanding the structure and function of the ear will help us to pick up problems early and improve the care of patients with ear problems.

Here’s a very helpful article published in the Nursing Times which explains about the ear and its role in hearing.

Personally my mind boggles when it comes to this subject. Cochlear anatomy is amazing and the cochlear itself is so tiny only 36mm in length and yet it does so much. Whilst there are many good explanations out there, anatomist Dr Sam Webster description from Swansea University is one of my favourites. Watch his video below for more information on cochlear anatomy. Be prepared to get a cup of coffee or tea and set 30 minutes aside to watch his explanation!

Images of the ear

Dr. Hawke is a Professor Emeritus, Department of Otolaryngology-Head and Neck Surgery at the University of Toronto. He is known both for his basic and clinical research in diseases of the ear and sinuses. He has travelled the world extensively as an Invited Professor delivering countless lectures and seminars.

He is one of the pioneers in medical photography. His images are captured using telescopic techniques that he also helped pioneer.

We recommend that you look at his documents on the diseases of the ear as they are incredibly useful.

Michael Saunders is a UK based ENT. His images of the ear canal and drum can be found on the ENT Bristol website along with very helpful descriptions.

Dr. Terry W. Owens was a board certified ENT specialist. He describes how to examine the ear, many common ear problems, what to look for, laboratory tests, common treatments and possible prevention. The text is clear, simple and with minimal technical medical terminology. Here is a link to his photobook which will help you to understand ear diseases.

Impression Taking Videos

Our otoscopy & impression taking courses will teach you how to take impressions safely and according to the BSA recommended procedure. You will be provided with practical time and knowledge to make sure that your impression reaches the second bend of the ear canal.

We recommend that you watch our Facebook videos on Otoscopy & Impression Taking before the course.

Communication Tactics

Communicating with someone who is deaf doesn’t have to be difficult. But you do need to be patient and take the time to make sure you are communicating properly. These are some of the simple things you can do to make communication straightforward for both of you. You can download this information here.

– Even if someone is wearing hearing aids it doesn’t mean they can hear you perfectly. Ask if they need to lipread.

– If you are using communication support, always remember to talk directly to the person you are communicating with, not the interpreter.

– Make sure you have face-to-face contact with the person you are talking to.

– Get the listener’s attention before you start speaking, maybe by waving or tapping them on the arm.

– Speak clearly but not too slowly, and don’t exaggerate your lip movements – this can make it harder to lipread.

– Use natural facial expressions and gestures.

– If you’re talking to a group that includes deaf and hearing people, don’t just focus on the hearing people.

– Don’t shout. It can be uncomfortable for hearing aid users and it looks aggressive.

If someone doesn’t understand what you’ve said, don’t keep repeating it. Try saying it in a different way instead.

– Find a suitable place to talk, with good lighting and away from noise and distractions.

– Check that the person you’re talking to is following you during the conversation. Use plain language and don’t waffle. Avoid jargon and unfamiliar abbreviations.

– To make it easy to lipread, don’t cover your mouth with your hands or clothing

See more tips on the RNID website.

Audiology Terms

We have put together a list of some words/terminology that might be used during your course. If at anytime your course trainer uses a word/term that you don’t fully understand please do ask for the meaning – your trainer will be happy to explain. You can download this information here.
Audiologist – health care professional who is trained to evaluate hearing loss and related disorders, including balance (vestibular) disorders and tinnitus, and to rehabilitate individuals with hearing loss and related disorders. An audiologist uses a variety of tests and procedures to assess hearing and balance function and to fit and dispense hearing aids and other assistive devices for hearing.
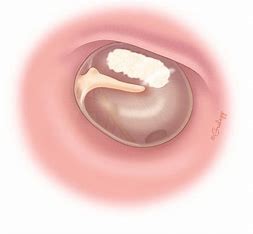
Ear canal / external auditory meatus / external acoustic meatus (EAM) – the canal extending from the opening in the external ear (pinna) to the tympanic membrane.

Mastoid / Mastoid process – a large, bony prominence on the base of the skull behind the ear, containing air spaces that connect with the middle ear cavity

Mastoid cavity – the removal of mastoid cells (usually following infection) results in a mastoid cavity. Sometimes the mastoid cavity is left open into the ear canal.

Retraction of the eardrum – the tympanic membrane is pulled inwards by the negative pressure within the middle ear. Discrete portions (sometimes weaker areas) of the tympanic membrane that are pulled inwards are known as retraction pockets.

Exostoses of the ear (swimmers ear) – the abnormal formation of a bony growth on the ear canal.

Otitis externa – inflammation or infection of the external ear.

Cholesteatoma – A tumour-like mass of keratinizing squamous epithelium (replacing skin cells) and cholesterol, usually occurring in the middle ear and mastoid region.

Otosclerosis / Ossicular Fixation – formation of new bone about the stapes or cochlea, resulting in conductive hearing loss.

Ossicular Discontinuity / Ossicular Chain Disruption – a loss of normal alignment between the three inner ear ossicles, resulting in conductive hearing loss.

Grommet – a small tube inserted into the eardrum in cases of glue ear in order to allow air to enter the middle ear

Acute Otitis Media – a middle ear infection of abrupt onset that usually presents with ear pain.

Otitis Media with Effusion (Glue Ear, OME) – the presence of non-infectious fluid in the middle ear

Suppurative Otitis Media – middle ear inflammation that results in episodes of discharge from the ear

Tympanosclerosis– the medical term for scarring of the ear drum. Scarring occurs after the ear drum is injured or after surgery

Decibel – The decibel (dB) is a logarithmic unit that expresses the ratio of two values of a physical quantity, often power or intensity : 20 log10 p1/p0