
(updated from Tracy James article from 2016)
The key to good fitting custom earmoulds and hearing protection, ITE and CIC hearing aids are accurate ear impressions. Its important to know when you’ve inserted your otostop deep enough down the canal, and that the otostop is pointed in the direction of the eardrum. A good, deep impression means getting to the 2nd bend of the ear canal. Some tell-tale signs that you’ve reached the 2nd bend include a characteristic slip of the otostop into position which often coincides with slight resistance as it enters the bony portion of the canal. When you look on otoscopy, you will see that the otostop is framed by the cartilaginous portion of the canal.
You may wish to mark your otolight. For standard adult ear impressions, mark your otolight placement tool at 16 mm from the tip to guide the otoblock exactly 4 mm past the ear canal’s second bend. For babies under six months old, use a 10 mm marker. I tend to use nail polish so that it stays on the light source. Also remember otolights can get hot. So always turn them off when you are not inserting the otoblock.
Also, what way are you facing the syringe when inserting. In example A shown below from Audiology Online https://www.audiologyonline.com/articles/making-good-ear-impression-setting-15855 there wont be enough energy for the material to get to the otostop as it using its energy against the canal wall. We want to syringe with minimal pressure so as not to go past the otostop so the placement of the syringe in the canal is critical.
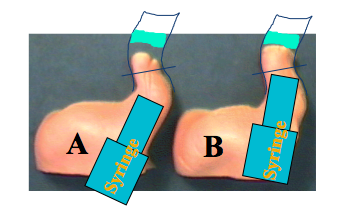
All ear canals are very different from one another and taking good impressions takes practice in fact from the same Audiology Online article is a very good comment below from Michele Hurley, the writer of the article.
“Sometimes there are challenging ears. Every ear, just like snowflakes, is different. We may see some canals that are very curvy; some are very straight. Those all impact how we need to shoot the impression. When you see a very curved ear canal, keep in mind that sound direction is going to be very important in the end product. We need to not only shoot for giving our manufacturer the depth and the angles of those curves, but we also need to keep in mind that sometimes we will need to do some modifications for good retention, as well as comfort with those sharp curves….” This is so important, earmould manufacturers don’t have crystal ball, so letting them know directions or any lumps and bumps that need to be shaved down for a good fit means less remakes for them, you and the client.
Patient/client safety is paramount and the British Society of Audiology has a recommended procedure for impression-taking in adults/children over 5 years of age and for children under 5 years of age. https://www.thebsa.org.uk/guidance-and-resources/current-guidance/
Louise Hart holds 1-day BSA accredited impression-taking courses at West Berkshire Museum once every 6 weeks for adults/over 5 years and on request for children/under 5 years. Learn how to take impressions safety and accurately according to the recommended procedure, using the correct brace positions during the procedure. Learn about what to look for on otoscopy and experience how to know when you’ve reached the 2nd bend.
Find out about Louise Hart and take a look at the website: www.tjaudiology.com
Training Calendar – TJ Audiology Training for more details regarding our courses, or email info@tjaudiology.com